

Why make a Tarp
We have used a selection of lightweight tents over the years for cycle touring. However we are always trying to save both weight and volume in our choice of gear while still retaining high levels of functionality. At the UK Cycle Touring Festival this year Brenda Cupryna gave a class on making your own Tarp and there was also a practical session on how to pitch them.We have already bought and tried super light bivvi bags but felt we needed a little extra protection for bad weather and also to give some privacy when camping in public places. A tarp seemed to be the answer. Using the bikes instead of poles saves weight and keeps the pack size to a minimum. We are also likely to notice if someone tries to steal the bikes during the night.


Materials and sizes
All the materials except the thread are available from www.pennineoutdoor.co.ukI chose 70 gsm silicone coated rip stop nylon for the tarp and 16 mm woven nylon webbing for the peg eyes. The rip stop nylon comes 1.5 m wide.
Version one:
was 2.5 m long and made from 2 widths. The seams are all double folded 20 mm so a total allowance of 60 mm for each seam. This gives a finished size of 2.38 m long 2.76 m wide. You need to order an extra metre to make the strengthening triangles for each of the edge pegging points. So order 6 m.
Each piece of webbing is 200 mm long and for this design 15 are required so order 3 m of webbing.
Version two:
Was 3 m long and used two full 1.5 m widths plus another 3 m x 0.66m width. (The distance between the head tube and the seat on our bicycles is approximately 0.6 m) This gave a finished size of 2.88 m x 3.36 m. So order 9 m of material. This will leave plenty to cut the triangles from.
There are 20 webbing pieces so 4 m is required.
Both versions:
I used Gutterman Mara 70 thread which gives extra strength while not being too thick. The down side is that it is difficult to buy in single 300 m reels. As it is a commercial thread it tends to be sold in boxes of 10 x 300 m. Also make sure you have a new sharp needle. A standard 80 is ok.
Optionally you can seal the finished seams with McNett Silsealer. I didn’t bother.
Cutting
Cutting and Sewing is easier if you have a bit of space! This fabric is very slippery and there is a lot of it!Cutting
Version one, first cut the main lengths of fabric. Version one is simple cut a 5 m length then fold it in half and cut again. Then cut the 12 right angle triangles 150 mm from the surplus material. ( cut 150 mm squares then cut them on the diagonal.You can make these bigger if you want up to 200 mm sides. Cut all 15 webbing lengths 200 mm.
Version two, cut a 6 m length then fold and cut. Cut the remaining piece to the same length as the first two then cut length ways at 720 mm. If you get this cut straight it makes sewing it together much easier.
Then cut the 12 triangles 150 mm equilateral from the surplus material. You can make these bigger if you want up to 200 mm sides. Cut all 20 webbing lengths 200 mm.


Sewing version one
Place the two pieces of material wrong sides together. I used quilting clips throughout to hold the material together. This seems to work better than pins and also keeps the numbers of holes made in the fabric to a minimum. Sew a seem 60 mm from the edge.

Open out the material with 60 mm seam uppermost. Fold the seam twice in 20 mm widths use clips to hold. Fold flat and sew down outer edge of fold then again down inner edge. ( Note, material management is critical here to stop it tucking under the seam you are sewing.)

Next sew on the 4 corner triangles. Fold a 15 mm seam on the long edge, hold using 2 clips 1/3 in from each end. Then clip the triangle to the corner of the tarp lining up the short edges to edge of the tarp. Sew across long edge then sew a parallel seam 10 mm in. Repeat in all other corners.


Next sew the triangles at each end of the centre seam. Fold 15 mm seams in on each short edge and clip. Place triangle point toward middle of tarp and middle of centre seam with long edge lined up with edge of tarp. Use clips to hold long edge. Sew along outer edge of short side seams then sew a parallel seam 10 mm inside. Repeat at other end.


Next sew the triangles on the sides. Space at 1/4, 1/2, 3/4 along each side. Use the same method as the ones you have just completed on the centre seam. Repeat for other side.


You are now ready to sew the perimeter seam. I sewed the front and back seams first then the two sides. But it doesn’t really matter. These seams are double fold 20 mm finished width so using 60 mm of fabric. Use clips to hold the seam the sew along the inner edge. Be careful as you pass the triangles as they tend to slip out as you remove the clips.
You should now have completed all the seams and just have to attach the webbing loops. Fold each loop in half and sew across 35 mm from the folded end to form the loop. I did forward then back for extra strength. Repeat for all 15 pieces. Then sew on all the perimeter webbing making sure you keep the top and underside lengths lined up as you need to sew quite near the edges. I sewed round the edge then a diagonal cross. These take a lot of stress so need to be firmly fixed. You can see them in the pictures above. Lastly sew the 3 webbing loops on the centre ridge. These are more difficult as they are in the middle of the material. Be careful to to let the excess slide back under the needle.

Congratulations you now have a finished tarp!
Making the stuff sack
For version one cut a round piece of material 120 mm in diameter and a rectangle 340 mm x 340 mm.For version two cut a round piece of material 150 mm in diameter and a rectangle 400 mm x 340 mm.
On each end of the top edge fold in a triangle approximately 20 mm extending 40 mm down the side. Sew in the edge of each triangle.

Fold a top seam down of 20 mm and sew leaving the ends open for the pull string.
Fold right side together ( seam facing out ). Then sew ends together 10 mm from the edge.

Next clip the round bottom to the bottom edge and sew approximately 10 mm in from the edge.

Pitching your tarp
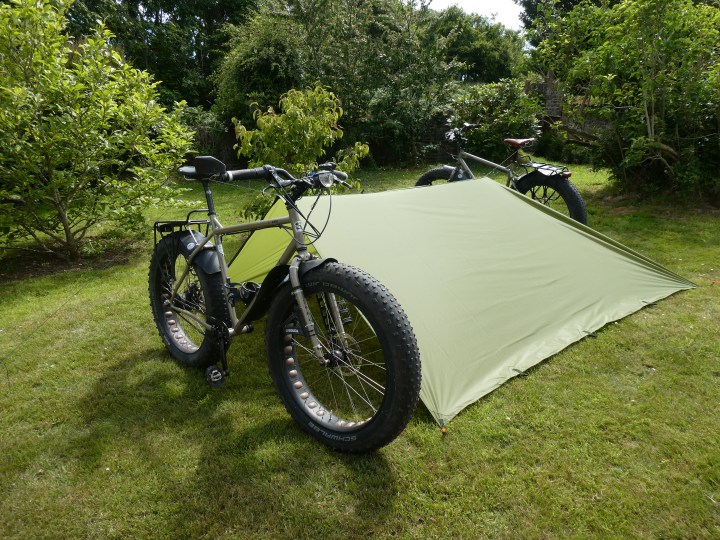
A tarp is a very flexible shelter and can be pitched in lots of different ways.For the basic A shape we pitch it between our two bikes but you could equally use 1.1 m long poles. Or 1 pole and 1 bike. Or even two trees if you are lucky enough to find them in the right place.
We use 2 mm diameter 3 m long guys for the main support. Tie them on the tarp with a bowline. Then do a rolling hitch round the seat rail and peg them in the ground using a slip knot. We leave about 0.5 m between the tarp and the bike at the open end so we can get in and out easily. We also like to sleep with our heads up at the open end so we can see the stars.
At the other end I tie the guy to the first loop in so we get a bit of protection. Again site the bike about 0.5 m from the tie point. Make sure you have a really good tension on this ridge line.
You can peg out the corners. Then finally tie a 1 m line to the rear centre loop and peg it down or tie it to the lower part of the bike.


For version two you need 2 more 3 m guys for the second ridge which we attach to the steering system again using a rolling hitch.
If you are pitching version two remember to have one end lower than the other. Otherwise the rain will collect on the flat roof section creating a large heavy pool which may make the tarp collapse.


Slip knot for guy ropes.
Happy Camping!
great to see this post. glad you are using them